UV System for AirTub - How to install
1
INTRODUCTION
The UV Disinfection Module is designed to eliminate bacteria, viruses, and other microorganisms using ultraviolet (UV-C) light. It provides an effective and chemical-free method of sterilization for various applications. This manual will guide you through its installation, operation, and maintenance to ensure optimal performance and safety.
*Lifespan: 5000 hours

2
SAFETY & INFORMATION
Electrical Safety
-
Warning: Do not plug in or operate unless the electrical panel in your location is equipped with a Residual Current Device (RCD) – also known as a Ground Fault Circuit Interrupter (GFCI) – and proper grounding. By law and for your own safety, all homes and facilities must have RCD/GFCI protection installed in their main electrical panels. If you are unsure what this means, or if your panel does not include this protection, do not connect your IceBath. Instead, consult a licensed electrician to install the necessary safety device.
-
Voltage Stability – Important Notice
If your area has a history of voltage fluctuations from the electricity provider, we recommend connecting the IceBath to the socket through a voltage stabilizer, a surge-protected power strip, or a UPS (Uninterruptible Power Supply). For more information on the appropriate solution, please consult a qualified electrician in your area.
⚠️ In case any damage occurs to the IceBath due to voltage fluctuations, it will not be covered by the warranty.
-
Warning ⚠️ : UV-C Light Can Be Harmful
-
When replacing the lamp (inside), do not look directly at the UV light when the module is operational.
-
Ensure the module is powered off before performing maintenance.
-
Keep the module away from flammable materials.
-
Follow all local regulations regarding UV light usage and disposal.
-
3
MEDICAL DESCLAIMER
Our ice baths are designed for wellness and recovery but are not a substitute for medical treatment. We hold no responsibility for any medical issues arising from their use. Users of all ages, including children, pregnant individuals, the elderly, and even athletes, should consult a physician before using this product to ensure cold therapy is safe for them. Please note that by using this product, users assume full responsibility for any associated health risks.
4
COMPONENTS

5a
If you have purchased the Airtub with the UV system
Connect the UV as shown in the image below
Essentially, we are placing the UV system between the chiller and the AirTub.


5b
If you have purchased the Airtub with the UV system and the Ozone
You will find these 2 modules into the box (image)
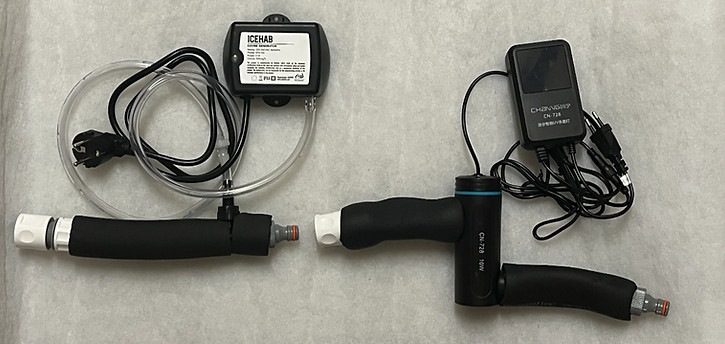
Simply connect them as you see on the image below:

Connect the UV and the Ozone together as shown in the image below.

6
CABLE CONNECTIONS
-
To operate the AirTub with the UV system, you will need a power strip with at least two sockets. One socket is for the AirTub, and the other is for the UV system. It’s recommended to connect both devices to a single power strip rather than separate outlets, allowing you to control them simultaneously.
*The power strip shown in the image is not included in our package, you will need to use one of your own. -
Once you connect the UV to the power, the screen will turn on, and you will see an indicator. By pressing the button on the right side, you can change the settings. This setting determines how many consecutive hours the UV lamp will operate within a 24-hour period. SET 24H

-
The UV lamp has a lifespan of 5,000 hours, so make a note of when it was purchased and when it will need to be replaced. So the lamp will need to be replaced in approximately 208 days.

💡Smart Control APP
-
If you have also purchased the Smart Control system we provide for the airtubs, you must plug the Smart Control into the power outlet and then connect the airtub to the Smart Control.
-
If you are also using a UV or ozone system, meaning you're using a power strip, you should connect the power strip to the Smart Control.
-
Important: Do not connect only the airtub or only the UV or ozone system to the Smart Control. The entire system must be connected through the Smart Control.

You are now ready to operate the system. Open the two valves of the TUB and turn on the chiller. The water will now start flowing through the UV system and will be sanitized in real-time.
Attention
Never let the UV lamp operate without water circulation, as it may burn out immediately. The lamp is designed to work only when water flows properly through the system.
For example, when you turn off the AirTub system to perform the filter bleeding procedure, make sure to also turn off the power strip to which the UV lamp is connected, so that it switches off as well.
7
8
LAMP REPLACEMENT
After the estimated time when your UV lamp needs to be replaced, contact us and we will send you a replacement.
To change the lamp, follow these steps:
-
Close both valves of the TUB.
-
Turn off the chiller by setting it to OFF.
-
Unplug the UV lamp from the power outlet.
-
Unscrew the lamp from the top of the UV unit (a small amount of water may come out, which is completely normal).
-
Replace the old lamp with the new one you received.
-
Screw the new lamp back into place.
-
Plug the UV lamp back into the power outlet.
-
Open the two valves of the TUB.
-
Turn on the chiller, and you're ready to go!

9
WARRANTY & SUPPORT
The UV Disinfection Module is covered under a 1 year warranty for manufacturing defects.
❌ Exclusions:
-
Misuse or unauthorized modifications
-
Improper maintenance
-
Physical damage due to external factors
If you encounter any issues that cannot be resolved using this guide, please contact our support team
Need Help? Talk to an Expert on WhatsApp
Or Send Us Directly
a Message