


Beginner's Guide to Ice Baths
If this is your first time using an ice bath, here are a few tips to help you get started:
-
For a while, until you get used to it, set the temperature to 10 degrees.
-
Before getting into the ice bath, take a warm shower.
-
A key requirement is to have peace and quiet in your space, with no one talking to you, and avoid hearing conversations, as this can distract your mind.
-
Get in quickly without thinking, within 4-5 seconds.
-
Do not submerge your arms past your wrists first.
-
Play some music, it will help the time pass faster.
-
Once you’re inside, stay still and remain motionless.
-
The first 10-20 seconds your body adjusts to the temperature and accepts the cold, so after 20 seconds, you won’t feel cold anymore, and you'll be fine.
-
Once you’re in, breathe slowly and deeply, both in and out. Don’t let yourself pant or breathe quickly. Try (it’s easy) to breathe very slowly for the first 30-40 seconds.
-
Start by sitting in for 1-3 minutes. Over time, as you get used to it, gradually increase the duration up to 5 minutes. Once you're comfortable with that, you can start lowering the temperature during future sessions.
-
Basic step: Once you finish your cold therapy session, it's recommended to stay standing and frozen outside the ice bath for 5-10 minutes. After this time, take a warm shower to bring your body temperature back to 100%.
*TIP: If it's summer and it's very hot outside, try skipping the warm shower to restore your body temperature, and you can stay in the summer heat for 4-6 hours without getting hot.
Enjoy your recovery session!
AirTub Home - User Manual - How to install
INTRODUCTION
Welcome to your AirTub, a portable and efficient cold therapy solution designed to enhance recovery and wellness. The AirTub combines an inflatable tub made from durable, double-wall drop-stitch material with a powerful external chiller, allowing you to enjoy cold therapy wherever you choose. With its ease of setup and versatile use, the AirTub is perfect for home use or on-the-go recovery. This manual will guide you through safe setup, operation, and maintenance to ensure you get the most out of your AirTub experience.
Attention
Once you have completed the installation according to the assembly instructions and connected all the components, the system is ready for operation all that remains is to fill it with water.
Before filling the AirTub with water, make sure that its final placement is correct and that you have easy access to the bottom valve of the Tub (on the back side). Once filled with water, it cannot be easily moved, and to reposition it you would need to drain it manually.
Therefore, first assemble and connect all the components properly, ensure that its position is correct and convenient, and then fill it with water.
User Hygiene Guidelines
Before you begin the installation, please take note of the following:
-
The Airtub should always be used after a proper shower with soap, thorough rinsing, and only when your body is completely clean.
-
If users enter the Airtub without proper hygiene, the water lifespan will be significantly reduced compared to the expected duration specified in the product guidelines at the time of purchase.
Handling Instructions
-
Before opening the boxes, please be aware that the chiller must remain upright at all times. The chiller should never be laid on its side or turned upside down
-
When removing the chiller from its box, ensure that it is handled carefully and kept in an upright position to avoid potential damage.
-
If the chiller is accidentally turned upside down, it must be placed upright and remain in that position for 24 hours before being operated. This allows the internal components to stabilize and ensures proper functionality.

YOU WILL NEED: POWER STRIPS (NOT INCLUDED)
-
If you purchased the AirTub only, (without UV or Ozone), you will only need a single power outlet for the entire system at your place.

-
If you purchased a UV or an Ozone system along with your AirTub, you will need a power strip with two outlets. This is because both the AirTub and the UV or Ozone need to be connected to the same power strip, allowing you to turn them off together if needed.

-
If you purchased both a UV and an Ozone system along with your AirTub, you will need a power strip with three outlets. This is because the AirTub, UV, and Ozone all need to be connected to the same power strip, allowing you to turn them off together if needed.

YOU WILL NEED: WATER HOSE (NOT INCLUDED)
-
You will need any hose that is long enough to reach from a water tap to the airtub in order to fill it. Be sure to choose the location carefully beforehand, as once it is filled, it becomes very heavy and cannot be moved.

IN THE BOX
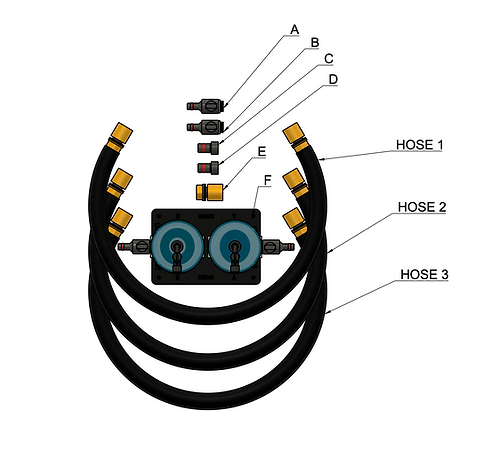
A, B = Valves for the tub
C, D = Adapters for the back side of the chiller
E = Adapter for draining the tub using your hose
F = Single 10inch Filter system
You will find 3 hoses included in the package.

Important General Information – Read Carefully
Before starting the installation, it is important to understand the basic points for the correct and safe operation of your system. Please read the following instructions carefully.
Water filter check
Check the water filter on a weekly basis. If it is dirty, wash it thoroughly or replace it. If the filter becomes clogged with dirt and is not cleaned or replaced in time, water flow may be reduced and damage may occur to the pump or other critical components of the system.
Water flow check
The upper outlet of the AirTub, meaning the upper hole on the tub, must always have water flow returning into the tub. You can easily confirm this by placing your finger at this point and checking that water is flowing back into the tub normally.
Proper room ventilation
The area where the system will be installed must be well ventilated. The space should have at least natural ventilation, so that the hot air produced by the chiller can be released properly.
Chiller distance from walls
The chiller must have sufficient free space around it, especially at the back. Leave at least 40 cm of clearance from any wall or object that may restrict airflow.
Failure to maintain adequate ventilation may cause the system to overheat and result in serious damage. If damage is determined to have been caused by insufficient airflow or restricted ventilation, it will not be covered under warranty.
Temperature setting
Never set the chiller below 3°C. Setting the temperature too low may cause freezing inside the system and serious damage to the chiller.
Outdoor placement
If the system is installed outdoors, it must be protected from rain, water, and direct sunlight. Always place the chiller in a dry, shaded, and well-ventilated area. Never expose the chiller to direct sunlight. The additional heat can prevent proper cooling, force the system to run continuously, and potentially cause damage.
Chiller Operation
When you turn on the chiller for the first time, the water will need time to reach the selected temperature.
This process can take approximately 4–15 hours, depending on the starting water temperature, ambient temperature, ventilation, and the target temperature you have set. For best performance, make sure the chiller has proper airflow, the filters are clean, and the water is circulating correctly.
Operation & Use
Never operate the system without water. Make sure the tub and circulation system are fully filled before turning on the chiller. Never operate the chiller without the water pump connected and powered. If the pump stops or disconnects during operation, turn off the chiller immediately. Do not operate the system with closed valves.
Annual Maintenance by a Qualified Refrigeration Technician
Once a year, preventive maintenance of the chiller must be carried out by a qualified refrigeration or air conditioning technician.
The technician must:
-
Completely switch off the system and disconnect the chiller from the power supply.
-
Open the outer cover of the chiller.
-
Carefully clean the inside of the chiller using compressed air.
-
Remove all accumulated dust from the condenser, from both the internal and external sides where accessible.
-
Remove with air any dust or dirt accumulated in other internal areas of the system.
WARNING
Do not use water, cleaning products, foam, sprays, or any other liquid inside the chiller or on its internal components.
Unlike some air conditioning cleaning procedures, annual maintenance of the AirTub chiller must be performed exclusively with dry compressed air.
Proper annual maintenance helps maintain cooling performance, correct airflow, and the long-term reliability of the system.
SETUP & INSTALLATION
STEP 1: Location and Preparation
Choose a flat, clean surface for the Tub, ensuring the area is free of sharp objects.
Place the chiller on a flat surface, away from water sources and protected from rain or excessive moisture
STEP 2: Unboxing and Setup
-
Open all the boxes and take out both the inflatable tub and the chiller
The chiller should never be laid on its side or turned upside down. When removing the chiller from its box, ensure that it is handled carefully and kept in an upright position to avoid potential damage.
If the chiller is accidentally turned upside down, it must be placed upright and remain in that position for 24 hours before being operated. This allows the internal components to stabilize and ensures proper functionality. -
Use the air pump to fully inflate the tub until it is stable and firm. Fill the system to a pressure of 10 PSI (as indicated on the pump gauge)
STEP 3: Tub Placement Guide
-
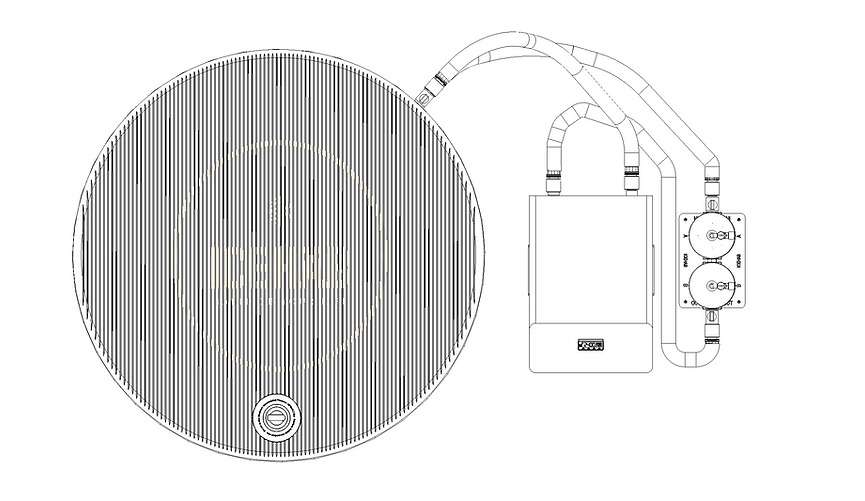
After inflating the Tub, place it in the desired location. Plan carefully where to position it beforehand, as once filled with water, it becomes too heavy to move. Ensure that the orientation of the water inlet and outlet hoses from the Tub is not against the wall. The connection points of the Tub where the hoses attach should be slightly angled (as shown in the reference photo) and facing the direction where you will place the chiller. This positioning prevents the water hoses from bending or creating sharp angles. Therefore, make sure the Tub is correctly positioned before starting to fill it with water.
-
Make sure the back of the chiller has enough space for proper ventilation. Airflow must be unrestricted.
STEP 4: Back of the chiller
-
First, remove the two plastic caps on top of the chiller.
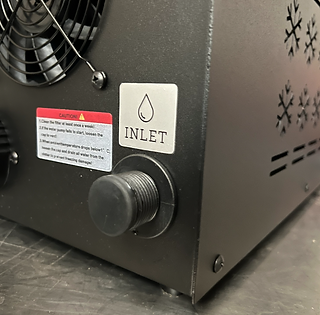
After removing the two plastic caps, install parts C and D onto the back side of the chiller and tighten them by hand only. Do not use any tools. Make sure the rubber seals are properly seated and the connections are firmly tightened to prevent leaks and ensure correct water flow.
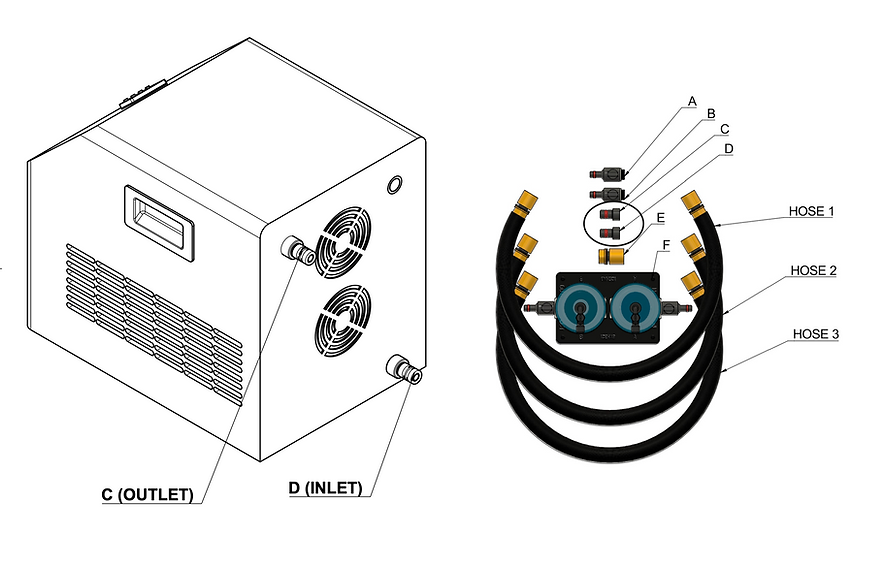
STEP 5:
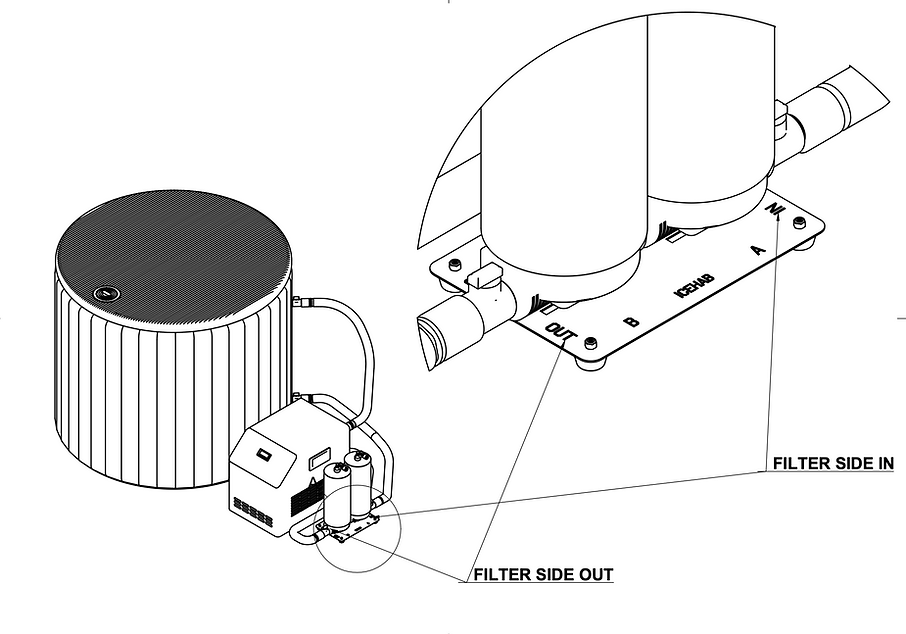
Place the filter system next to the chiller and pay close attention to the filter direction.
The “OUT” side of the filter should face the front side of the chiller, while the “IN” side of the filter should face the back side, as shown in the image. This setup is required because the lower valve of the tub will be connected with a hose to the “IN” side of the filter. Therefore, the “IN” side of the filter system must face the back side of the chiller.
Make sure the transparent filter housing containing the filter isproperly tightened to prevent any leaks.
STEP 6:
Installing the two valves onto the AirTub.
Screw parts A and B onto the tub, tightly by hand only, do not use any tools. Make sure the rubber seal is properly positioned and fully seated to ensure a secure connection and prevent any water leakage.
Connect the hoses as shown in the image.
• One hose connects from the lower valve of the tub to the “IN” side of the filter (Hose 2)
• One hose connects from the “OUT” side of the filter to the “IN” side of the chiller (Hose 3)
• One hose connects from the “OUT” side of the chiller to the upper valve of the tub (Hose 1)
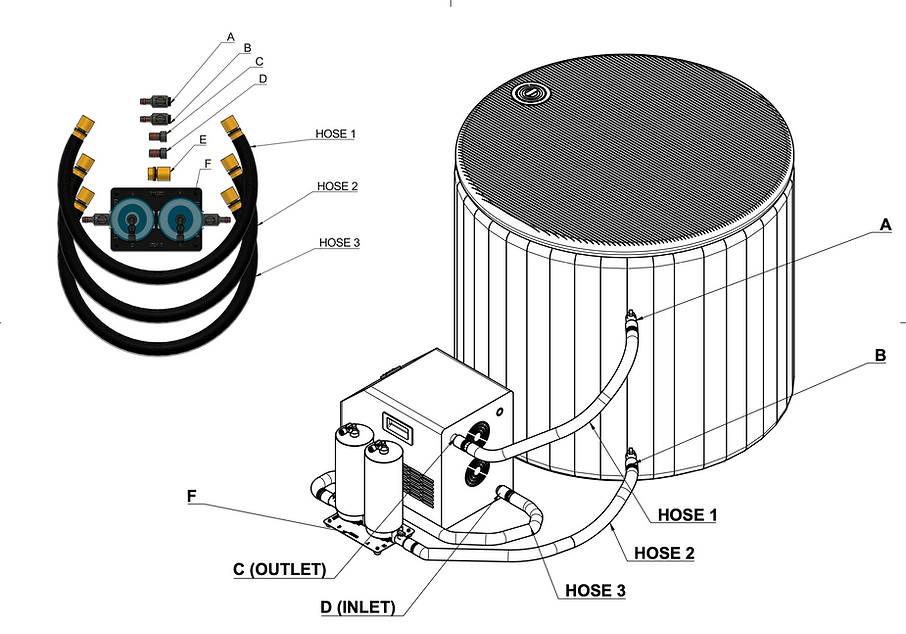
The final result should look like this, with the exact order of the connected pipes and devices.

If you want to place the tub and the chiller in different locations
The installation and any hose extensions must be carried out by an experienced plumber. The hoses provided with the system are long enough to allow this setup. However, if you need longer hoses, they can be extended using a hose with the same diameter and the same type of connection fitting. This must be done by your plumber, following the basic installation instructions below.
The basic rules are as follows:
1. The chiller, the water filters, and the UV module, if included, must always be moved together. Wherever the chiller is placed, the filter system and the UV module must be placed there as well.
2. Only specific hoses can be extended. The hoses that can be extended are the hoses that connect the AirTub to the chiller and filter system. Specifically:
a. The hose that goes from the upper valve of the AirTub to the OUT outlet of the chiller.
b. The hose that goes from the lower valve of the AirTub to the IN inlet of the filter.
3. UV and Ozone placement.
If your system includes UV and/or Ozone, only the UV module can be placed remotely from the tub. The Ozone system must remain connected directly to the upper valve of the AirTub.
4. IMPORTANT: The hose between the filter and the chiller must not be extended. The hose that connects the filter to the chiller inlet must remain at its original length. For this reason, the filter system must always be installed together with the chiller, wherever the chiller is placed.
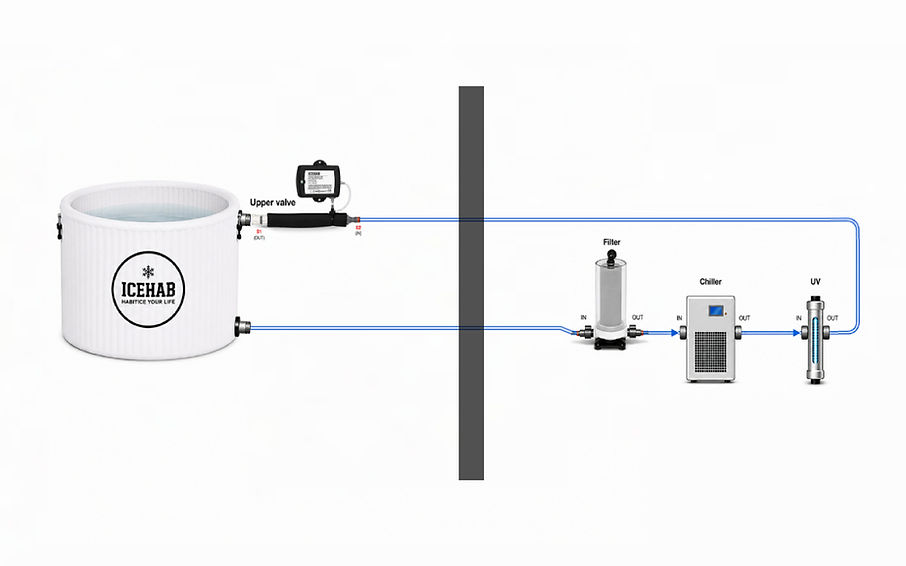
Important: This setup can only be extended up to a maximum distance of 5–5 meters between the chiller and the tub.
Skip this step if you have not purchased the UV or Ozone system.
EXTRAS (UV, OZONE)
-
If you have purchased either the UV or Ozone system, please click the corresponding button below to continue with the installation process.
-
The UV and Ozone systems should only be installed after completing all previous setup steps (1 to 6)
After completing the installation of the Uv or Ozon, return to this page to continue from the step 7 below.
STEP 7: Turn Off all the valves
At this stage, make sure that all the valves in the system are turned off, because in the next steps, you will be filling the AirTub with water.
There are 3 valves to turn off:
-
The 2 valves on the AirTub.
-
The 1 black mini valve on the filter.
-
2 valves on the filter (inlet and outlet) / Leave both open.
STEP 8: Distance from walls
Before filling the system with water, make sure the chiller is installed with sufficient space around it for proper ventilation.
The chiller must have a minimum clearance of 30 cm from walls or obstacles on all sides, front, back, and both sides. This airflow is essential for correct operation and cooling performance.
Insufficient ventilation may cause overheating, reduced efficiency, or damage to the system. Damage caused by improper installation or inadequate airflow is not covered under warranty.
STEP 9: Main power cable
Connect the power cable and make sure the on-off switch at the back of the chiller is turned OFF.
Don't turn on the chiller yet
STEP 10: Now it's time to fill the Tub with water
Before filling the AirTub, make sure you have placed it in its final desired position. Once filled, the water adds approximately 200 kg of weight, making the tub very difficult to move.
Filling & Correct Water Level
Use a hose connected to a water tap and fill the AirTub up to the line indicating the recommended water level inside the tub.
DO NOT turn on the system until the AirTub is filled with water.
The pump and chiller must never operate without water.
The recommended water level has been calculated so that when a person of average body size enters the AirTub, the rising water level does not cause the tub to overflow.
However, since body size varies from person to person, the ideal water level may be different for each user.
During your first use, carefully enter the AirTub and check how high the water level rises. Then adjust it accordingly:
A. If there is still enough space before the water reaches the top of the AirTub:
You can add a little more water if you wish.
B. If the water overflows when you enter the AirTub:
Remove enough water so that when you enter, the water level remains below the top of the tub and does not overflow.
Simply put: the line inside the AirTub indicates the recommended starting water level. The final water level should be adjusted according to each user’s body size.
STEP 11: SYSTEM AIR RELEASE
Once the AirTub is filled with water, the filter needs to be purged of air.
To perform the air release, the system must be turned off (main switch at the back of the chiller set to OFF).
A. Turn on the 2 valves on the AirTub and the 2 valves on the 2 sides of the filters
B. Open the 1 small black valve located on top of the filter system. You will see the filter filling with water. After approximately 4–6 seconds, water will begin to come out of the small valve. As soon as this happens, immediately close the valve. The air release is now complete.
C. Make sure that after completing this step, the mini valve on the filter system is turned OFF. It's important for the system to operate.
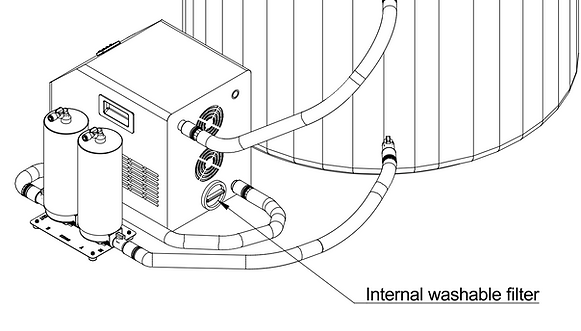
D. Bleeding Air from the Internal Filter
On the back of the chiller there is a built-in internal filter (see image). Using your hand, carefully loosen the filter cap by only 1–2 turns. Do not remove it completely. Allow a small amount of water and any trapped air to escape for approximately 2–4 seconds. Once the water flows smoothly, tighten the filter cap again by hand. This simple procedure removes trapped air from the system and helps ensure proper water circulation.
STEP 12: Starting the system
For the system to operate:
A. Turn on the 2 valves on the AirTub.
B. Turn on the 2 valves on both sides of the filter system.
C. The 1 mini valve on top of the filters must remain closed.
At the back of the chiller, turn the switch to the ON position.
Method of use:
At the beginning, you will hear a noise similar to a pump running. This is normal, the system is removing air from inside the chiller and starting the water circulation process.
After a short time, the water pump will begin operating. This means the water flow has started successfully. Place your hand inside the AirTub, directly in front of the upper connection hole, and you should feel water flowing from inside the hole.
Carefully inspect all connection points for possible leaks while the system is running. If you notice any leakage, immediately turn the system OFF, close the valves, and securely re-tighten the fittings before restarting the unit.
The chiller compressor will begin operating approximately 3 minutes after startup.
The system has two main operating functions you should understand: continuous water circulation and cooling.
The water pump operates continuously to circulate the water through the system. The cooling function activates only when there is a demand to lower the water temperature.
Once the water reaches the selected temperature, the cooling function automatically stops, while the water circulation pump continues running normally.
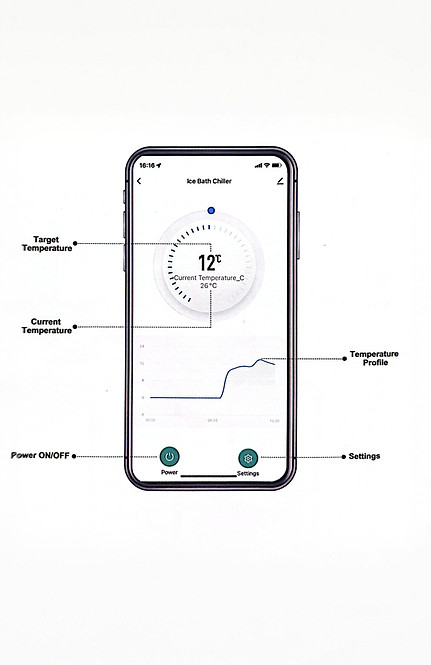
🕒Operating Schedule Function
Through the software, you can set specific days and hours for when the cooling system should operate or stop operating.
This is especially useful if the unit is installed in a space where complete silence is required during certain hours, such as at night.
Important:
When the system stops due to a scheduled shutdown, only the cooling function is disabled. The water circulation system remains active and continues operating silently in order to keep filtering and circulating the water 24/7.
STEP 13: Mobile APP on your hands

STEP 14: Chiller Thermostat for Local Manual Control
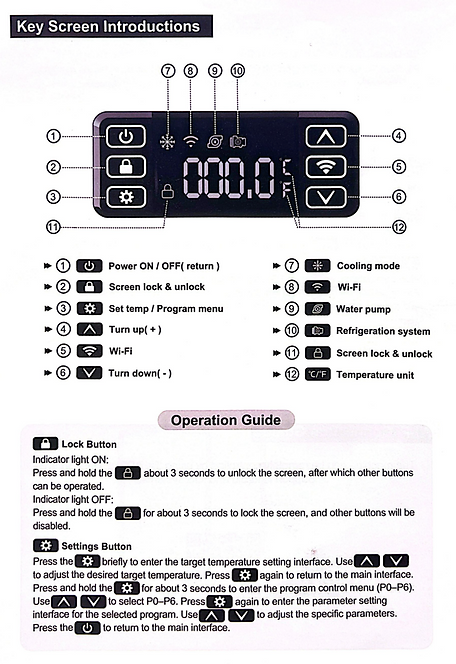
Temperature Correction
Go to the app settings, select Temperature Correction, and make sure it is set to 0.

Installation Completed
At this point, the installation has been completed successfully and your system is ready for use.
Please read the following instructions carefully in order to fully understand the correct operation of your system, its maintenance requirements, and all important safety guidelines.
Proper installation, operation, and maintenance are essential for the performance, longevity, and safe use of your AirTub system.
FILTER REPLACEMENT & WATER DRAINAGE
After some time of operation, the filter will accumulate dirt, so you will need to either replace or wash the internal filter cartridge.
Before replacing the filter, turn the switch on the back of the chiller to the OFF position. The system must not be running during the filter replacement process.
Disconnecting the Filter System
Step 1: Close the 2 valves on the AirTub.
Step 2: Close the 2 valves on both sides of the filter system.
Step 3: Disconnect the filter system and move it to a sink, as some water will drain from the filter during replacement.
Opening the Filter & Replacing the Cartridge
Step 1: Unscrew the filter cap.
Step 2: Remove and replace or wash the internal filter cartridge. We recommend installing a new filter cartridge each time.
Step 3: Screw the cap back on and reconnect the filter system to the hoses you disconnected earlier.
Important: Make sure the hoses are connected in the correct direction. The A (“IN”) side of the filter system must be connected to the hose leading to the lower valve of the AirTub.
Step 4: On the back of the chiller, there is an internal washable filter. This filter should also be cleaned every time you replace the external filter. With the entire system OFF and the valves closed, unscrew the cap, remove the filter, and wash it thoroughly with water in a sink.
After cleaning, reinstall the filter and securely tighten the cap.
Step 5: Open the 2 water valves on the AirTub (top and bottom) and the 2 valves on both sides of the filter system.
Step 6: Bleed the air from the filter by opening the small black valve on top. Once the air has been released, close the valve again.
Step 7: Finally, turn the main switch on the back of the chiller to the ON position.
Important: Do not turn on the chiller before completing the air-bleeding process.
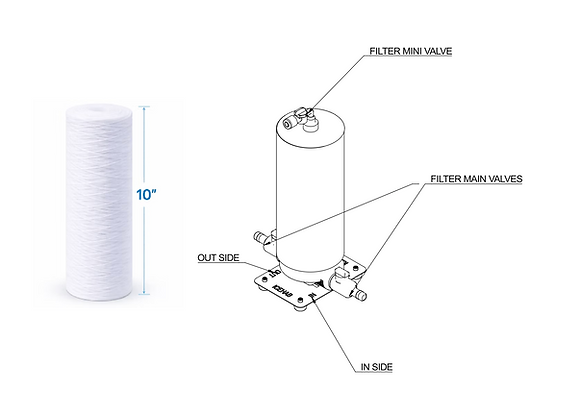
📌Inside the chiller package, we have included 1 replacement water filters
This is meant to cover your first filter change, so your system is never left without filtration while you purchase new ones from us.
We strongly recommend purchasing filters directly from us, as they are specifically designed to match the exact specifications of your AirTub. If you buy a filter from another source and it is even slightly smaller in size or does not fit perfectly in the system, dirt will pass into the water pump, which may eventually cause it to burn out. In such a case, if debris is found inside the pump, the warranty will not be valid, which is why we advise always using our original filters.

Draining the water out of the Tub
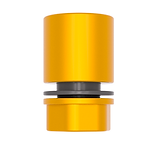
*If you want to drain the water further away from the tub, for example, to a balcony, we have already provided you with a quick connector (see image). You can attach a hose from your home to this connector (if you don't have one, purchase a 12mm garden hose) and connect it to the bottom valve of the AirTub as an extension.
Step 1: Set the system to OFF and turn off the 2 valves on the AirTub and the 2 valves on both sides of the filter system.
Step 2: At the bottom valve of the Tub, remove the hose from the valve. (Do NOT unscrew the valve from the Tub, only the hose with the adapter).
Step 3: Open ONLY the bottom valve of the Tub and let the water drain out.
When, at the end of draining, there is still some water left and you want to turn the AirTub upside down to let it drain completely, be very careful not to tilt it towards the side where the two valves are located. If the weight of the tub presses on the valves, there is a high risk they will break. For this reason, always turn it over from the opposite side.
OPERATION INSTRUCTIONS
🔺 Priority No1 – Filter Check
Please carefully check the image below. The filters must be inspected and replaced as soon as they reache level 2 (slightly yellowish). If you allow them to progress to stage 3 or 4, the excessive buildup of dirt can cause serious damage to the system.
The filter must be checked regularly to ensure it is not too dirty. If you notice a significant build-up of debris or residues, it should be immediately either replaced or rinsed with clean water. Regular maintenance of the filter is crucial.
⚠️ Warranty does not cover damage caused by using an excessively dirty filter, as this is considered a result of misuse.
For proper and safe system operation:
-
✅ Always follow the user instructions.
-
✅ Check the filter frequently.
-
✅ Replace it promptly once it reaches stage 2.
-
✅ Do not allow it to reach stage 3 or 4.
-
✅ Enter the tub only when clean to reduce water contamination.

-
Chiller Operation
When you activate the chiller for the first time, it takes time for the water to reach the desired temperature. This can take several hours (4-10) depending on environmental conditions and the target temperature.
-
Entering the AirTub
Make sure the AirTub temperature is at the desired level. Take a shower before entering to maintain water clarity and hygiene.
-
After Use Recommendations
Keep the AirTub filled and the chiller continuously on to maintain efficiency for daily or weekly routines. Close the lid after use to maintain temperature.
-
Indoor Use
If you use the AirTub indoors and want to lower the temperature below 8-10°C, you may notice that the filter, exposed to indoor air, starts to sweat due to temperature differences. This is normal because indoor air is warmer. The temperature difference in materials causes condensation. The AirTub and its hoses are insulated to prevent this process, but the pump and filter may still produce moisture.
What can you do?
Cover the entire filter with a towel to prevent direct contact with air, which will stop condensation and sweating. Do the same for the pump.
💧🔁 WATER FILTER – INSTRUCTIONS / AIR & CORRECT OPERATION
The filters must always contain water. During normal operation, the water level should be at least halfway up the filter, ideally to the top. If you notice the water level is very low or empty, perform air bleeding (see Step 11 in the guide).
If after bleeding and a few hours pass the water level drops again well below the middle, it means something hasn’t been installed correctly. In that case, check the following step by step:
Switch the system to OFF and follow all steps below.
1: The lower valve on the AirTub (the one that sends water to the filter) may need to be tightened a bit more. Try turning it a little more by hand, do not use tools. Tighten it just until it no longer turns easily by hand, without applying excessive force.
2: Make sure the filter caps (the clear plastic ones) is securely tightened. If needed, tighten it a bit more.
At this stage, perform air bleeding (see Step 11) and restart the system.
If after all that air continues to enter the filter and the water level drops again below halfway, please contact us for further support.
Sleep Mode During Extended Absence
If you will be away for several days, such as during a holiday, and the system will not be used for more than 3–4 days, you can activate what we call Sleep Mode. In this mode, the system continues circulating and filtering the water without cooling it.
To activate Sleep Mode, open the app, go to the Calendar, and set the dates and times during which you want the system to stop cooling. When the system is switched off through the Calendar, only the cooling function stops; the water circulation and filtration system continue to operate.
To switch the system off completely, unplug it from the power supply or turn it off using the main switch on the back of the chiller. If UV or Ozone modules are connected, make sure these are also switched off.
⚠️ SAFETY INSTRUCTIONS & USER GUIDELINES
GENERAL SAFETY
This product is designed exclusively for water cooling use.
It is not a medical device.
Use is at the user’s own responsibility.
Always operate the unit according to these instructions.
⸻
REFRIGERANT R290
This unit contains R290.
The refrigeration system is hermetically sealed and does not require any user intervention.
Please do not perform:puncturing, cutting, welding, or any modification of the refrigerant circuit
In the unlikely event of a leakage, ensure proper ventilation of the area and avoid sources of ignition.
⸻
WATER QUALITY – IMPORTANT NOTICE
Using water of poor or unsuitable quality may cause serious damage or complete failure of the system.
In areas with hard water (high mineral or salt content), operating the system without proper testing or treatment may lead to blockages, corrosion, or malfunction of critical components.
If you are unsure about your water quality, consult a water specialist to test mineral and salt levels.
If levels exceed acceptable limits, you must use appropriate treatment or filtration systems before operating the unit.
The water used must be clean, drinkable, and compliant with European Union drinking water standards.
Any damage caused by unsuitable or poor-quality water is not covered by the warranty.
⸻
VENTILATION
Use only in well-ventilated areas.
Do not install in enclosed cabinets or small, unventilated spaces.
Ensure free airflow around the unit at all times.
⸻
INSTALLATION & PLACEMENT
Maintain at least 30 cm clearance around the chiller to ensure proper airflow for intake and exhaust.
The unit must be placed on a stable, level surface in a shaded location.
Direct sunlight must be avoided, as it reduces cooling efficiency and may cause overheating or system damage.
Ambient temperature must not exceed 35°C.
If installed indoors, the room must be well ventilated.
If installed outdoors, the unit must always be fully shaded and protected from direct sun exposure.
Failure to follow these instructions may result in equipment damage and void the warranty.
⸻
ELECTRICAL SAFETY
The system must only be connected to a properly grounded electrical installation.
Do not connect or operate the unit unless the installation includes a Residual Current Device (RCD) or Ground Fault Circuit Interrupter (GFCI).
If you are unsure, consult a licensed electrician before use.
If your area experiences voltage fluctuations, it is recommended to use a voltage stabilizer, surge protector, or UPS system.
Damage caused by unstable voltage is not covered by the warranty.
Do not touch plugs or electrical components with wet hands.
⸻
OPERATION & USE
Never operate the system without water.
Ensure the tub and circulation system are fully filled before turning on the chiller.
Never operate the chiller without the water pump connected and powered.
If the pump stops or disconnects during operation, immediately turn off the chiller.
Do not operate the system with closed valves.
Ensure proper water circulation at all times.
Do not set water temperature below 3°C.
⸻
MAINTENANCE
Clean and replace filters regularly to ensure proper operation.
Do not open or disassemble the unit.
All repairs must be carried out by qualified technicians only.
⸻
CHILLER SAFETY
The chiller must be protected from direct contact with water.
The unit is not waterproof and must always be placed under a roof, canopy, or protected area when used outdoors.
Ensure proper airflow at all times to prevent overheating.
⸻
PROHIBITED USE
Do not use near open flames or sparks.
Do not use in explosive environments.
Do not modify or alter the unit.
Do not operate in extreme heat or enclosed spaces without airflow.
⸻
TRANSPORTATION
Always transport the unit in upright position.
If tilted or laid down, leave it upright for 24 hours before operation.
Avoid shocks, impacts, and drops during transport.
⸻
STORAGE
Store in a cool, dry place away from heat sources.
Avoid direct sunlight and high temperatures.
⸻
IN CASE OF LEAKAGE
Turn off the unit immediately.
Leave the area and ventilate the space thoroughly.
Do not use electrical switches or any devices that may create sparks.
Contact a qualified technician.
⸻
IN CASE OF FIRE
Use CO₂ or dry powder extinguishers.
Do not use water.
⸻
SUPERVISION
Always supervise children and pets around the system.
⸻
LIABILITY DISCLAIMER
The manufacturer and importer are not responsible for any damage resulting from improper use, failure to follow the instructions, unsuitable water quality, unstable electrical supply, or unauthorized modifications or repairs.
Our ice bath products are designed for wellness and recovery purposes and do not serve as a substitute for medical treatment.
We do not assume any responsibility for potential medical issues or health conditions that may arise from the use of our products.
Users of all ages, including children, pregnant individuals, elderly users, and athletes, are advised to consult with their physician prior to use, in order to ensure that cold exposure is safe and appropriate for their individual health condition.
By using the product, the user accepts full responsibility for any health-related risks associated with its use.
Furthermore, we assume no responsibility for injuries, accidents, or damages related to electrical issues in cases where the required safety installation conditions have not been followed, as clearly stated in these instructions.
The operation of the unit requires that the installation includes proper electrical safety measures, such as a residual current device (RCD), a certified electrical panel, and inspection by a licensed electrician, in accordance with applicable laws and safety standards.
If the user does not agree with any part of the safety instructions or terms of use, they may return the product before opening the packaging and putting it into operation.
By opening the packaging and using the product, the user confirms that they have read, understood, and fully accepted all safety instructions and terms of use.
Icebath Cleaning & Maintenance
Water Hygiene
The water in your icebath functions like a living organism, as it comes in direct contact with your body. That’s why it requires regular maintenance to stay clean and safe for use.
1. Water Check
You should check the condition of the water at least once a week. If the water changes color, clarity, or smells unpleasant, it most likely needs to be replaced.
2. Based on your cleaning system:
a. Icebath with basic water filter (no UV or Ozon):
-
The water should be replaced every 3 to 4 weeks.
-
The water filter should be checked weekly:
-
If it is filled with dirt, hair, or has become dark, it must be cleaned or replaced.
-
A clogged filter restricts water flow, reduces cleaning efficiency, and may lead to pump damage.
-
🛑 Important: If the filter is not cleaned or replaced for an extended period and becomes fully blocked, dirt may enter the pump or cause overheating.
In such cases, the warranty does not cover pump damage, as it results from improper maintenance.
b. Icebath with UV or Ozon system:
-
Water replacement can be extended to every 2 to 3 months, depending on how often and how cleanly the bath is used.
-
It is strongly recommended that you shower thoroughly with soap before entering the icebath.
-
The filter maintenance and replacement routine remains exactly the same as above.
3. When you're not using the icebath for a few days
If you don’t use the icebath for 2–3 days or more, the water becomes stagnant, creating ideal conditions for bacteria to form.
👉 In such cases (or generally whenever you’re not using the bath):
-
Open the lid, and
-
With your hand, stir the water vigorously in a circular motion for 20–30 seconds to create a swirling effect.
This helps with oxygenation and prevents stagnation.
4. Airtub Cleaning During Water Changes
Every time you drain the icebath and refill it with fresh water, it is essential to also clean the inside of the Airtub:
🧽 Use a sponge with a little bleach and water to thoroughly disinfect the interior surfaces.
💦 Then, rinse thoroughly with plenty of clean water to remove all bleach residue.
The bleach is necessary to properly sanitize the material of the Airtub and ensure it stays hygienic for the next use.
5. Final Note – Caution:
Do not keep the same water beyond the recommended timeframes. Long-term water use can lead to bacterial growth and increase the risk of contamination, which can negatively affect your health.
Chiller – Dust Blowing – Every 6 Months
Proper maintenance of the chiller is essential to maintain maximum performance and long-term operation. The most common cause of reduced cooling efficiency is dust buildup that blocks ventilation. For this reason, the chiller must be cleaned at least every 6 months.
If the chiller operates outdoors or in a dusty environment, cleaning every 6 months is absolutely necessary.
Chiller Cleaning Procedure
-
Turn off the system completely.
-
Close all valves.
-
Disconnect the filter from the chiller.
-
Place the plugs on the two chiller ports and take the chiller with you.
-
Transport it to the cleaning area without tilting or inverting it.
• A suitable cleaning area can be a workshop or any place with a strong air compressor, as shown in the image below.
-
Cleaning with compressed air:
• Use strong air pressure to blow inside the chiller.
• Blow air from all sides, including the back where the fans are located.
• Also blow from the side openings, aiming towards the inside, where dust accumulates.
• Do not tilt or flip the unit.
• Make sure all dust is completely removed.
-
After cleaning, reconnect the chiller and turn the system back on.
⚠️ Important Warning:
If cleaning is not performed every 6 months, especially in dusty environments, dust may block the airflow, causing overheating and damage to internal components (compressor, PCB, fans, etc.).
Any damage caused by dust or insufficient ventilation is not covered by the warranty.

DURING HARSH WINTER
-
If you have an airtub or ice bath placed outdoors, keep in mind that during winter, when temperatures drop below freezing (e.g., below 0°C), you must never turn off the machine. If the system is turned off, the water in the pipes could freeze and cause damage. Some customers have mistakenly turned off the machine, thinking that the cold weather outside would cool the water naturally. However, the machine doesn't just cool the water—it also ensures constant water circulation, preventing it from freezing. So, always keep the machine running to maintain water flow and avoid freezing or potential damage to the system. Additionally, if the outdoor temperature drops below -1,-2°C, you’ll need to move the machine indoors until the extreme cold weather passes. The process is simple: close all the valves of the tub, disconnect the hoses, and move the machine to a warm indoor space (you can leave the tub outside with the water, as it won’t be damaged). By following these steps, you can ensure the system remains safe during cold weather conditions.
TROUBLESHOUTING
Problem: The chiller stops cooling before reaching the desired temperature
Solution: The system includes an overheating protection mechanism. If the room temperature is too high or the chiller is placed in a corner or too close to a wall, hot air from the ventilation can get trapped, causing the unit to overheat.
Make sure the back of the chiller has enough space for proper ventilation. Airflow must be unrestricted.
The system will temporarily stop for safety reasons and automatically restart once the temperature drops to a safe level. If this happens frequently, move the unit to a cooler or more open area.
Problem: Water is not cooling
Solution: The only reason for water not cooling is lack of circulation. If there’s no circulation, something is blocking the flow. Most common reasons:
• very dirty filter, or
• something clogged the water inlet (lower hose inside the AirTub).
How to check:
Place your hand inside the tub in front of the top hole (water return) and check for flow.
❌ No flow → turn off the system immediately and contact us.
✅ Flow exists → still turn off the system and contact us.
Important:
Always keep the filter clean. Wash it regularly or replace it to ensure proper circulation.
Problem: The pump makes a strange fluctuating noise
Solution: Air has entered the filter, usually from sudden movement in the water. It’s normal and easy to fix. Bleed the filter – see STEP 11.
Problem: I set it to 5°C, but when it gets there, it stops and then the temperature rises.
Solution: That’s how the chiller works. It restarts 3°C above the target.
Example: Set to 7°C → stops at 7, restarts at 10°C.
Problem: Loud or unstable pump noise
Solution: The filter needs bleeding, especially after vacuuming.
Problem: Water is not circulating enough or at all
Solution 1: The filter must be on the ground, not elevated.
Solution 2: The filter must be at least half full of water.
Solution 3: Check for kinked hoses.
Problem: The temperature doesn’t reach the set level
Solution 1: Verify screen settings and check for dirt in filter or pipes.
Solution 2: Check for bent hoses.
Solution 3: Make sure the cooling symbol appears on the thermostat.
Solution 4: If the filter is clogged, clean or replace it.
Problem: Leakage at connections
Solution: Tighten all connections.

Need Help? Talk to an Expert on WhatsApp

Or Send Us Directly
a Message